Fruity Limiter Tutorial: Limiting, Compression, and Sidechain in FL Studio
Many FL Studio users install expensive third-party plugins before giving the stock plugins a fair chance. One plugin that is often underestimated is Fruity Limiter. While its name suggests it’s only a limiter, this plugin is much more powerful than most beginners realize.
Fruity Limiter combines a Limiter, Compressor, Sidechain Compressor, and Noise Gate into one lightweight plugin. Whether you’re mixing vocals, controlling drum peaks, or creating the classic pumping sidechain effect, Fruity Limiter has everything you need without increasing your CPU usage.
If you’re new to mixing or simply want to get more out of FL Studio’s built-in tools, this guide will walk you through the essential features and best practices.
What Is Fruity Limiter?
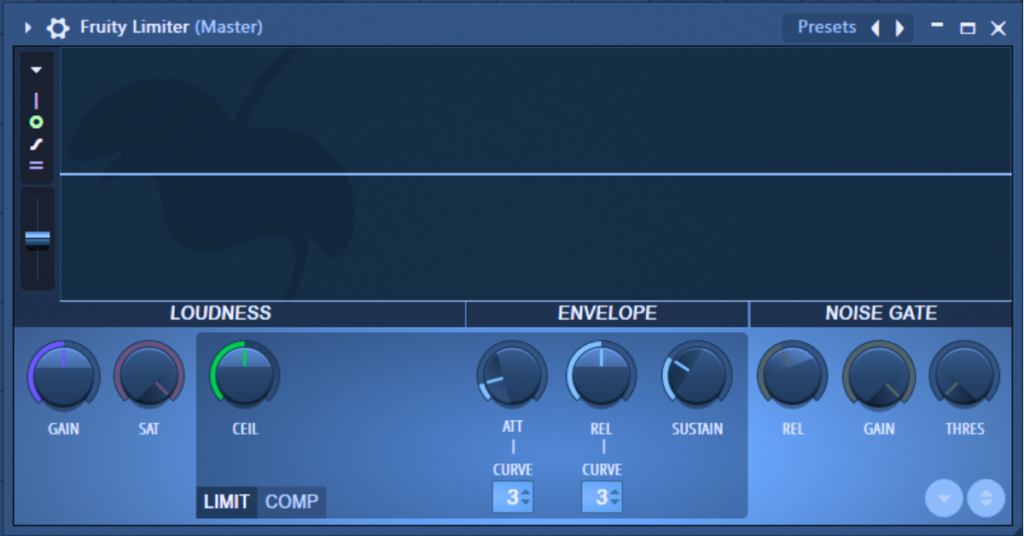
Fruity Limiter is a stock dynamics processor included with FL Studio. It helps control audio levels, reduce unwanted peaks, and shape the dynamics of your mix.
Instead of using separate plugins for limiting and compression, Fruity Limiter combines multiple processing tools into one interface. This makes it a great choice for beginners while still offering enough flexibility for experienced producers.
Some of its most useful features include:
- Peak limiting
- Dynamic compression
- Sidechain compression
- Noise gate
- Real-time waveform monitoring
- Low CPU usage
Understanding the Fruity Limiter Interface
The interface is divided into two main processing modes:
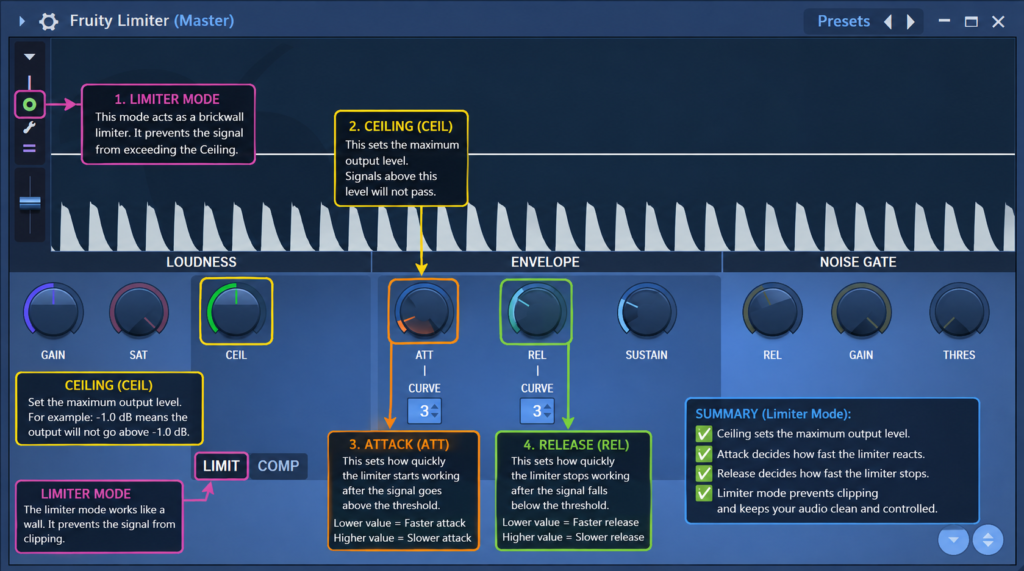
1. Limiter Mode
Limiter Mode prevents your audio from exceeding a specific output level. This protects your mix from clipping and digital distortion.
The most important controls include:
- Ceiling
- Attack
- Release
- Sustain
The visual display helps you see exactly when the limiter is reducing peaks.
2. Compressor Mode
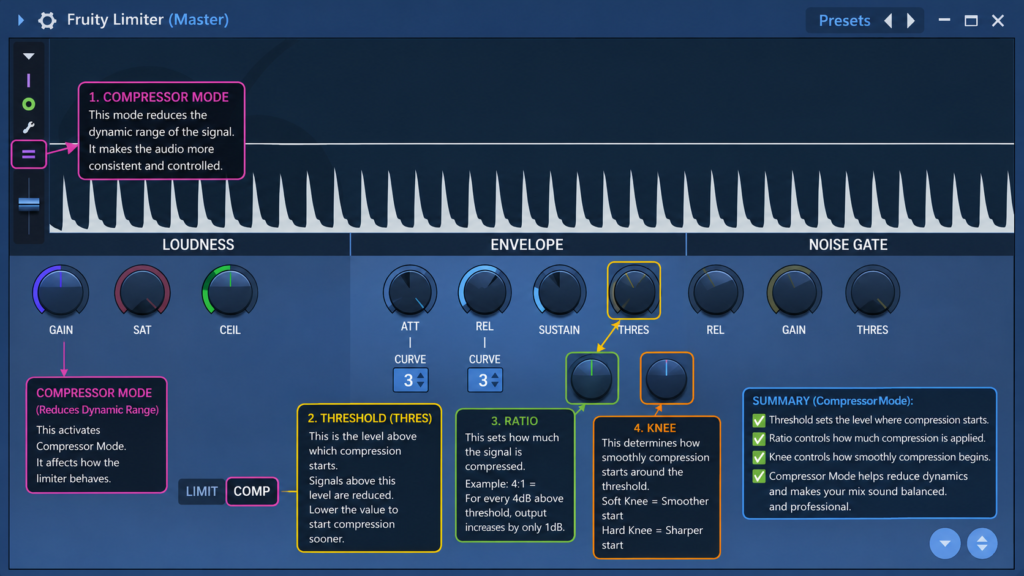
The Compressor section is designed to reduce the dynamic range of your audio.
Instead of allowing loud sounds to stand far above quieter sounds, compression helps create a smoother and more balanced signal.
You’ll mainly work with:
- Threshold
- Ratio
- Knee
- Attack
- Release
These controls allow you to shape the character of your sound while keeping it natural.
How to Create Sidechain Compression
One of Fruity Limiter’s biggest strengths is its built-in sidechain compressor.
Sidechain compression is commonly used in EDM, Pop, Hip-Hop, and House music to make the kick drum cut through the mix.
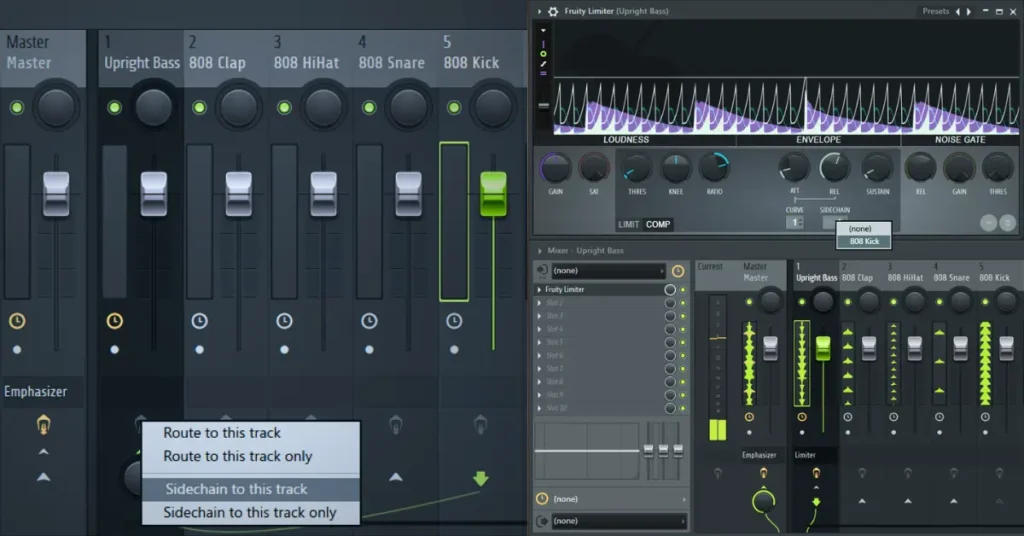
Step 1
Route your Kick track to your Bass track using FL Studio’s Mixer.
Step 2
Insert Fruity Limiter on the Bass channel.
Step 3
Open the Compressor tab.
Step 4
Select the Sidechain input.
Step 5
Adjust the Threshold and Ratio until the Bass ducks smoothly whenever the Kick hits.
Finally, fine-tune the Attack and Release settings for a natural pumping effect.
Why the Visual Display Matters
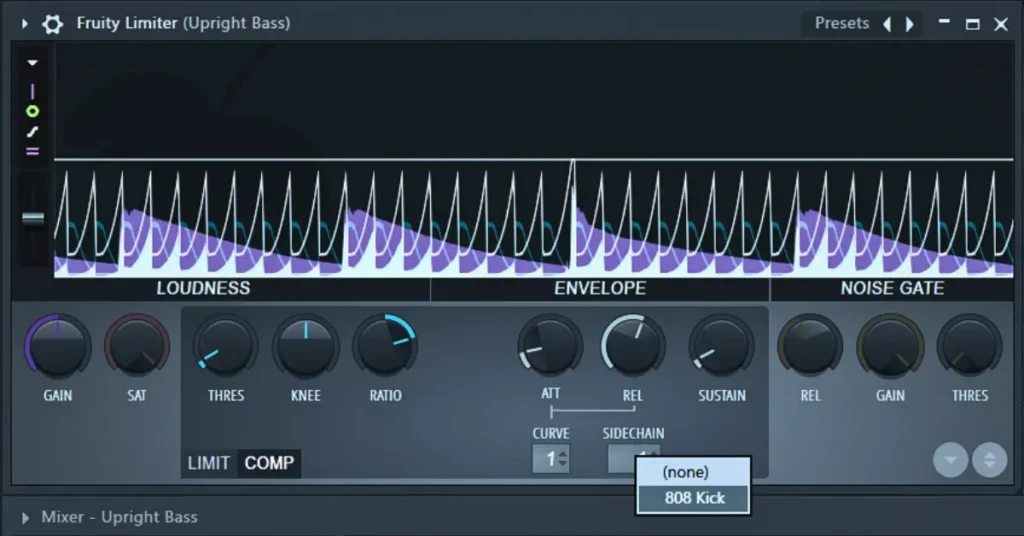
One feature that makes Fruity Limiter beginner-friendly is its real-time display.
It allows you to monitor:
- Input signal
- Output signal
- Gain reduction
- Peak levels
- Compression activity
Although your ears should always be the final judge, this visual feedback makes it much easier to understand what’s happening inside the plugin.
Tips for Better Results
To get the best performance from Fruity Limiter, keep these tips in mind:
- Avoid using extreme compression.
- Adjust the Threshold gradually rather than making large changes.
- Use slower Release settings for smoother compression.
- Trust your ears more than the visual meters.
- Save custom presets for different instruments.
Small adjustments usually produce better results than aggressive settings.
Common Beginner Mistakes
Many producers struggle with Fruity Limiter due to simple setup errors.
Avoid these common errors:
- Setting the Ratio too high.
- Lowering the Threshold too much.
- Ignoring Attack and Release settings.
- Over-compressing every track.
- Relying only on visual meters instead of listening carefully.
Learning how each control affects your audio will improve your mixes much faster.
Why Producers Still Use Fruity Limiter
Despite the availability of premium plugins, Fruity Limiter remains popular because it offers:
- Excellent performance
- Low CPU consumption
- Easy-to-understand interface
- Reliable sidechain compression
- Built-in limiter and compressor
- Perfect integration with FL Studio
For many producers, it’s still one of the most practical stock plugins available.
Final Thoughts
Fruity Limiter is far more than a basic limiter. It’s a complete dynamics processor that can handle limiting, compression, sidechain compression, and noise gating without requiring additional plugins.
Whether you’re producing EDM, Hip-Hop, Pop, or cinematic music, learning how to use Fruity Limiter will improve both your mixing workflow and your final sound.
Instead of overlooking this stock plugin, spend some time experimenting with its controls. Once you understand how each setting works, you’ll discover that Fruity Limiter is capable of delivering professional-quality results while keeping your projects efficient and organized.
You can also check: Best free Plugins for FL Studio
Frequently Asked Questions
Is Fruity Limiter good for beginners?
Yes. Its simple interface and built-in visual feedback make it one of the easiest dynamics processors to learn in FL Studio.
Can Fruity Limiter replace third-party plugins?
For many everyday mixing tasks, absolutely. It provides limiting, compression, sidechain compression, and noise gating in a single plugin.
Does Fruity Limiter use a lot of CPU?
No. Since it’s a native FL Studio plugin, Fruity Limiter is very lightweight and performs well even in large projects.
What’s the difference between a Limiter and a Compressor?
A limiter prevents audio from exceeding a maximum level, while a compressor reduces the dynamic range by controlling the difference between loud and quiet sounds.
Want more music production tips and free tools?
👉 Bookmark this blog or subscribe and start building your dream studio today!

Hi, I’m Nikhil Farenjiya, a music producer and professional singer with 10 years of experience. I share my knowledge and passion for music through writing to help aspiring artists grow. My blog is dedicated to inspiring and guiding music lovers on their creative journey.